Adventure with installing OpenWRT on Mikrotik RB750GR3
I want an OpenWRT router for my homelab. Before this the only router to my homelab is a meager TPLink Archer, which is really just a plug & play Wifi router with almost no room for customization. The motivation for a router upgrade is mainly feature-wise. I want to install Pihole for my network, but this TPLink router doesn’t give me a reliable method to redirect all DNS traffic to my Pi. I want to use Wireguard to connect into my home from outside, but the router only supports OpenVPN. Ultimately, I want to do port-knocking to keep my network locked out of prying eyes.
OpenWRT seems like a nice option for a security-conscious router operating system. Because it’s Linux, I can sort of expect a good deal of customization & extensibility, and a healthy amount of public security to weed out bugs. Because of this, I’m interested to get a router that I can install OpenWRT on.
I spent around a week shopping around because I have to find good solution that are: 1. easily available in my country, 2. are performant enough, and 3. supports OpenWRT natively, I decided to grab a Mikrotik router. I used to had experience setting up a Mikrotik for my old company, and I found that the box are generally geared toward more complex use case than just home internet, but still rather cheap. The rationale behind buying Mikrotik for me is that, even if I fail to install OpenWRT, I will still have a router that is plenty powerful for my need (albeit running a closed source OS).
With that in mind, I set out to buy a Mikrotik RB750GR3 💭 💭 RB stands for RouterBoard from a nearby shop.
The Router 🔗
The hardware shop seller asked me: “Why don’t you get a E50UG?”
A quick search on my phone reveal that Mikrotik is now offering a new improvement version of the RB750GR3, using a brand new chipset. The purported performance increase can be almost 2 – 2.3×. The downside? OpenWRT hasn’t supported it, yet. So that’s not a viable choice for my quest.
“Are you sure? This new version has twice the RAM, from 256 to 512MB”
Oh boy. If anything, the old PC gamer in me is a real sucker for spec increase. 256MB more of that sweet sweet router RAM. And also a newer ARM64 chip. And I will only have to shell out 10 more dollars for it. What a steal! Should I abandon this foolish quest of trying to jailbreak a router. After all, more hardware is better, right?
“No thank you man, I’ll have the RB750GR3”
With that said, I am now a proud owner of a home-lab rated small router.
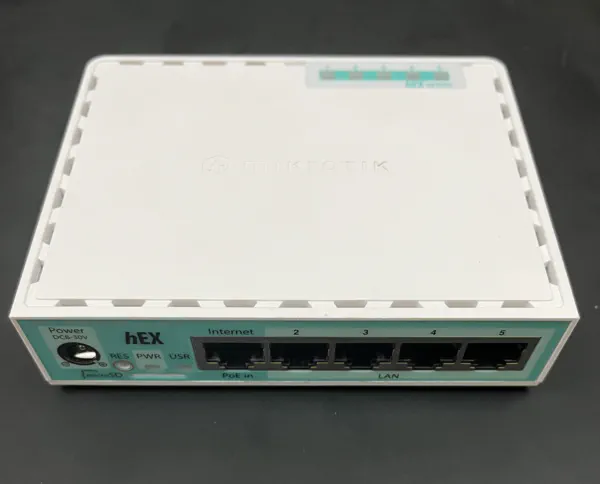
The RB750GR3 came in a small, unassuming carton box. I love the appearance of the Mikrotik boxes, since the last one that I had to work with. They strike a good minimal look, no unnecessary flair, and expose all the connection that you need. Let’s try it out first.
Router OS 🔗
Router OS is the operating system for their whole line of router offerings. Back when I had to work with the RouterBoard at my workplace, the OS was at its 6th major release. The OS looks pretty good, with a very comprehensive GUI web interface and another Linux-y interface to interact with it. I don’t have much to says about the GUI interface, it feels rather clunky for my taste & log myself out after every page reload. The CLI for me is however pretty powerful comparing to other router brands that I worked with like TPLink or Draytek, because for the first time I see that we can automate a router with a bunch of scripts. The CLI can be accessed through a tab on the web UI, or through SSH-ing into the router.
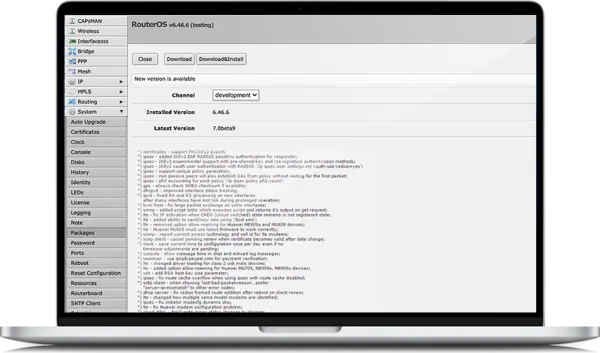
This time around, I saw that Router OS has now progressed to V7, with a slicker looking UI. I’m sure some clunky UX would had been resolved 💭 💭 I saw that they had a search functionality now! , but we are not here to use Router OS. Time to do what we came for: installing OpenWRT
Installing OpenWRT 🔗
A bit of researching on OpenWRT’s guide page to install on a Mikrotik box let us know the general procedure of installing OpenWRT on a Mikrotik box:
- We setup a PXE boot server somewhere in a network, serving an
initramfsimage of OpenWRT. - We put the router into Etherboot — the name Mikrotik give to their devices’ netboot mode.
- The router will pick up the PXE boot server, then download the OS image to it’s memory & boot a temporary version of OpenWRT
- We then login into the OpenWRT’s web UI (LuCI), use its software upgrade capability to flash a permanent version of OpenWRT into the board
Seems very simple. Unfortunately, I have no idea what initramfs, PXE or netboot means. Gotta crawl around the internet for a bit. The term netboot is simple, it speaks for itself: the idea is that you have a machine boot an operating system image from somewhere on the network. In order to netboot, you need a sort of pre-OS execution environment that will connect to the network, find out the server in the network to fetch the operating system image, and then boot it. That environment is called Preboot eXecution Environment, or PXE (pronounced pixie)
💭
💭
You can imagine that putting the second E into the acronym won’t be a popular choice.
. Finally, initramfs is a operating system image file format that contain the root filesystem, to be loaded directly into memory. Think of it as the compressed operating system content, to be run live in RAM.
With the keywords out of the way, let’s crack on.
The preparation 🔗
Before getting to do the installation, I need to get some stuff out of the way:
- Backup the router license key. Even though they find that the license is embedded directly inside the hardware, being careful goes a long way. The procedure can be find here
- Prep a PXE server to serve the OS image. The guide uses TinyPXE on Windows to setup the PXE server, but since I don’t have a Windows machine around for this, I’ll do it straight on my Mac, using
dnsmasq. For now let’s just installdnsmasqfirst withbrew install dnsmasq. - Ensure a correct RouterBoot (the bootloader) 💭 💭 Honestly I’m not sure if it’s the correct terminology, because it seems like RouterBoot is also the equivalent of BIOS on this router device version on my router. Between the last 6.x version and version 7.19, the bootloader will send OpenWRT into a bootloop. My router came with 7.18 installed, so I have to either roll it back to 6 or upgrade it to 7.20. I decided to upgrade it to 7.20 💭 💭 or so I thought. This is really a key source of all my upcoming frustration
The images 🔗
We are getting to the exciting part. We need to download the OS image file to boot. The documentation from
OpenWRT note that you need to download OpenWRT version 23.05.0-rc3 for the netboot, otherwise it won’t be able to load the OS in
1
1
The real reason is a
“too high Entry point address”. What this means though, I don’t really know for sure. Let’s just say that the image got too big to be loaded into RAM.
. So we navigate to the
OpenWRT firmware selector and download the firmware files
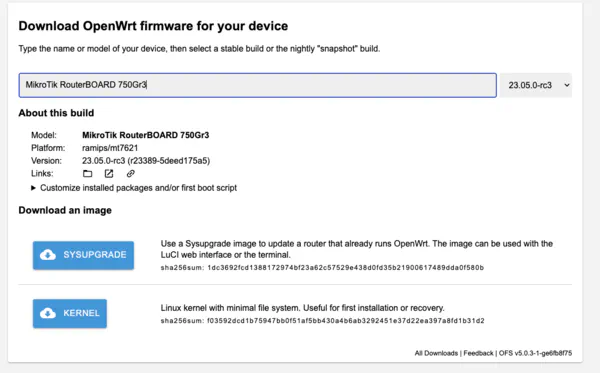
There are two image file options to download. The descriptions are very explanatory. I will download the kernel
2
2
Below I will also refer to this file as the initramfs file.
option when I want to do the first installation (i.e. netboot). Then for the next step, I’ll use the sysupgrade image to upgrade the (temporary) OpenWRT version into the permanent version. I’ll download the kernel file version 23.05.0-rc3, then I’ll go grab the sysupgrade file version 24.10.2, which is the latest supported version for RB750Gr3 right now.
Before we do anything with those files, it’s crucial that we verify the checksum. One corrupted file will probably brick my 70 USD router straight away. It wouldn’t take too much time either. 💭 💭 On a normal day I would just eyeball the hash, but I’m feeling extra careful today
# This is on my Mac. I'm quite sure that the syntax on GNU Linux would be a bit different
cat << EOF | sha256sum -c -
f03592dcd1b75947bb0f51af5bb430a4b6ab3292451e37d22ea397a8fd1b31d2 openwrt-23.05.0-rc3-ramips-mt7621-mikrotik_routerboard-750gr3-initramfs-kernel.bin
50f2fad004906be91e98ff473f1ed289de0c67d34d576057ce97a66286f1a20c openwrt-24.10.4-ramips-mt7621-mikrotik_routerboard-750gr3-squashfs-sysupgrade.bin
EOF

# what you should see
openwrt-23.05.0-rc3-ramips-mt7621-mikrotik_routerboard-750gr3-initramfs-kernel.bin: OK
openwrt-24.10.4-ramips-mt7621-mikrotik_routerboard-750gr3-squashfs-sysupgrade.bin: OK
Netbooting 🔗
Let’s start the boot. The process of netbooting for OpenWRT, according to their documentation is something like this:
-
Set a static IP address for your machine’s ethernet interface. The guide recommended
192.168.1.10/243 3 This is probably due to the fact that right afterward this interface will be used for connecting to the temporary OpenWRT installation, which works initially in the network of192.168.1.0/24. This step is different for different machine. If you are following along, let this be an exercise for you. -
We plug the ethernet cable into the router WAN port (Port 1), because the router will listen to PXE command from the uplink, which is the WAN port 4 4 Think of it this way, we are making our machine the router, and the router is instead a client machine in this very small network of two. .
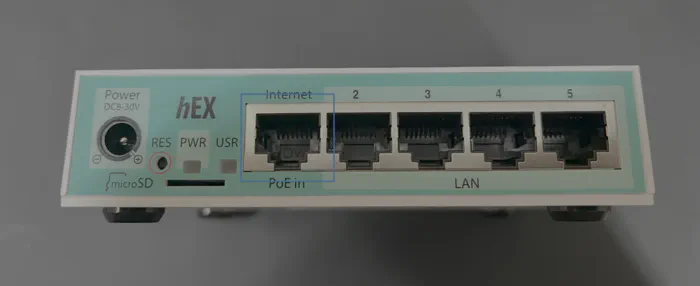
The WAN Port -
We start a PXE server that will broadcast its role in the network through DHCP & BOOTP
- I set this up with
dnsmasqlike thisdnsmasq \ --no-daemon \ --listen-address 192.168.1.10 --bind-interfaces \ -p0 \ --dhcp-authoritative \ --dhcp-range=192.168.1.100,192.168.1.200 \ --bootp-dynamic \ --dhcp-boot=openwrt-23.05.0-rc3-ramips-mt7621-mikrotik_routerboard-750gr3-initramfs-kernel.bin \ --log-dhcp \ --enable-tftp \ --tftp-root=$(pwd) - The PXE server will serve the
initramfsfile through another protocol named Trivial File Transfer Protocol (TFTP). The router should be able to download the kernel file from my machine & then load it into RAM for execution
- I set this up with
-
We plug the power into the router while pressing the
RSTbutton to put it into the Etherboot/netboot mode. After about 15 seconds, we will see network activity in the PXE server, and we can stop pressing the RST button.- I use a little screwdriver for my glass frame to push it. You can use a paper clip to the same effect
-
The router will blink its
USRLED, indicating OS startup. After finishing the boot, the USR LED will turn solid & the netboot process completes.
The temporary OpenWRT installation 🔗
By the time the netboot process completes, the Ethernet cable between my computer & the router should plug into port 1 on the router. By this step I am supposed to unplug it and plug in to another LAN port (2–5).
Be absolutely sure that the netboot process has completed. Which means when the USR LED stops blinking quickly. Unplug it while the router is flashing the initramfs would very probably brick your precious router
Upon connecting to the LAN port, my computer now became a client inside the Router networks. Luckily, the previously defined address of my computer: 192.168.1.10/24 works inside the OpenWRT’s default address range, so I can now connect to OpenWRT’s control interface — named LuCI
5
5
This can also be done with a command line interface, by means of SSH-ing into it
on the default gateway address 192.168.1.1. By default there will be no password, so I just need to login with username admin and leave the password field empty.
Now we have confirmation that OpenWRT can run on our router.
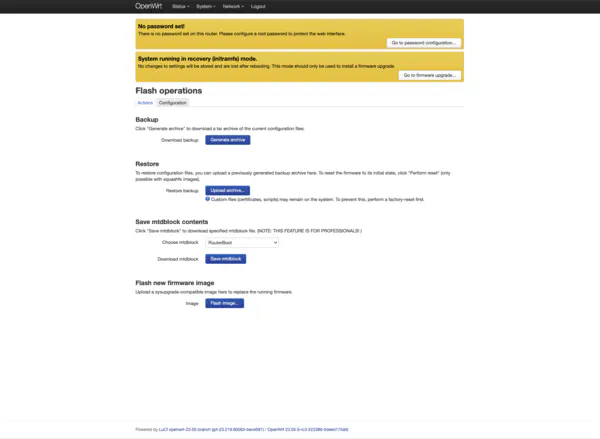
The next step is to flash a new firmware image into it. At this point, we find the sysupdate image downloaded previously and upload into the Flash image dialog. Again, verify the checksum before continuing.
After clicking submit, the USR led will blink repeatedly again for about a minute or two while the firmware is being flashed into the device. The router will automatically restart, with a sort of tick sound from a relay. By this point, the router should boot into OpenWRT and start a network at 192.168.1.1. At this point, the document recommends me to set my computer’s LAN to use DHCP instead of static IP, so we can see already if OpenWRT can start DHCP correctly.
So I did that and waited for 5 minutes without the computer’s LAN being configured. Something is wrong here.
Fix up the issue 🔗
I feared the worst possible outcome: the router is unexpectedly bricked. Anyway, I have to start approaching this problem by:
- Attempt to revert the router back to Router OS
- Identify what could have went wrong 6 6 In hindsight, the investigating step should have been done first before I do anything else with the router. Alas, I panicked and was truly fearing for the life of my router. I had to be sure it isn’t bricked yet.
- Retry with a different configuration
First thing first, reinstalling Router OS.
Reinstalling RouterOS 🔗
Mikrotik provides a custom tool to help ease the process of (re-)installing RouterOS. To be fair, what it does is probably the same process as we did above with installing OpenWRT, but they provide a single consolidated tool to do everything. The process is highly detailed on the Mikrotik’s documentation. First we had to download the correct stuffs:
- Navigate to Mikrotik’s download page and download the tools I need:
- Download
NetInstall. Because it doesn’t support MacOS and I don’t have a Windows machine, I had to use the CLI version for Linux. - Download a RouterOS image. -> Be sure to pick an appropriate CLI version. The CLI’s major version should match the RouterOS version you are installing.
My first attempt was to install the latest v6 RouterOS. So I downloaded the netinstall & the routeros package, untar them & get the binaries.
I mean I could have just reinstall directly v7. But I wasn’t giving up on installing OpenWRT yet, and I wanted to put the last RouterOS version that was reported to be able to switch to OpenWRT. So last v6 would be the choice
The process is as follow:
- Set the ethernet to a static address, again. This time it needs to be somewhere in
192.168.88.0/24. The guide suggested doingsudo ifconfig <interface> 192.168.88.2/24 - Start
netinstallby runningsudo ./netinstall -r -a 192.168.88.3 routeros-mipsbe-${VERSION}.npk- Okay why is this a different address than above? Well, this is actually the address to be assigned to the router during the installation process
- Plug the ethernet from your computer into the WAN port. Press the RST button while plugging power into the Router
- Keep pressing RST until we see some activities on the terminal. The netboot & installation process is working
Your terminal output should looks like this:
Using server IP: 192.168.88.2
Starting PXE server
Waiting for RouterBOARD...
PXE client: 01:23:45:67:89:10
Sending image: mips
Discovered RouterBOARD...
Formatting...
Sending package routeros-mipsbe-6.48.1.npk ...
Ready for reboot...
Sent reboot command
After the installation completed, the router will reboot. Unplug the ethernet cable from WAN port into LAN1 port & access into 192.168.88.1 and we will be greeted with RouterOS login interface again.
Phew, my precious router hasn’t been bricked yet. Let’s investigate where the OpenWRT installation might go wrong.
Trial & error 🔗
What could have went wrong during the installation? Pretty much everything. I’m not well equipped to understand all those embedded engineering problems, so my best bet would be to just trawl through OpenWRT forum & documentations for explanation. So let’s recap what happened after the first OpenWRT installation.
The problem: the router doesn’t provide network connectivity The symptom:
- connecting to the router show nothing. No DHCP being active to hand out IP to my computer.
- The LEDs still works
- Pressing RST will reboot the router. Then it starts to reboot periodically, in a loop.
This seems pretty likely to be a bootloop. Again, the documentation only mentioned a possible cause of boot loop on this setup being a faulty range of RouterOS version. The solution is to either upgrade it to more than 7.19.6 (which I already did, to 7.20) or revert it to 6.49.11 or before. The thing is, upgrading to 7.20 is only pupportedly able to solve the issue.
The logical thing to do here is to really follow the advice and revert the Router OS back to 6.49.11 and try the process again. Armed with the knowledge & process of how to install, both RouterOS & OpenWRT, I started trialling with several version of RouterOS: 6.49.11, 6.49.8, 6.49.2. Nothing works.
At this point, I tried to follow along a
Youtube tutorial. I followed their steps exactly, down to the exact version of OpenWRT 21.02, RouterOS 6.49.2. Ultimately, I still failed. The Router is still stuck in a loop.
Desperation 🔗
I’m going to be frank. When I first started to write this piece of blog, the title was “How I tried (and failed) with installing OpenWRT on Mikrotik RB750GR3”. I was ready to accept failure after 3 fruitless days of tackling a weird problem that I am not academically equipped to deal with. I was just thinking that by documenting my failure, maybe a good passerby on my blog would point out where I did wrong.
Welp, 10 minutes in writing this post, I realized the issue: All I did was trying to install different version of RouterOS. RouterOS doesn’t handle booting of OS. It’s the RouterBOOT.
Salvation 🔗
Mikrotik bundle both the RouterBOOT & RouterOS binary into one package. It makes sense because nominally RouterBOOT only has to support RouterOS. You don’t have to maintain different versioning scheme for those two things and then also maintain a version skew table. It should be upgraded in tandem by default, and relieving that duty for the user. Right?
Well, for some reason, they didn’t make it clear that by installing a newer RouterOS version, you are not yet installing a newer RouterBOOT version. And it’s the old RouterBOOT version that caused the bootloop.
How did I checked? When running the initramfs OpenWRT, I SSH-ed into it, read the following file
$ cat /sys/firmware/mikrotik/hard_config/booter_version
7.18.2
Damnit. Why didn’t I think of this sooner. Now all I needed to do was:
- Reinstall RouterOS & upgrade it to the latest version
7.20.4 - Go to RouterOS CLI, run
/system/routerboard/upgradeto also upgrade RouterBOOT - Reboot & verify by running
system/routerboard/print
Afterward, we redo the OpenWRT installation. Step by step. As outlined in the section above.
The USR LED stopped blinking. I hear the internal relay switched off the router & switch it on again. I move the Ethernet cable from port WAN to LAN1. Finally I navigate to 192.168.1.1.
The moment of truth. Drum roll please 🥁
It worked 🎊 🎉. Like a dream.
I was really afraid that it was a dream. So I rebooted the router & try accessing it again. It still works!!!
I now have an awesome OpenWRT router on my hand.
Fin 🔗
Did I need to go through all that? Probably not. There are commercial offering that pre-install OpenWRT on their routers, like GL-iNET. I can just have delegated everything to the guys who know what to do.
But the whole experience was very educative. I now know a bit more about the boot process on embedded devices, how to put them into netboot mode & boot a different OS on them. Ultimately, the best lesson I learnt after this was to be patient and always try to crack the problem from many angle. If you are stuck, just write down everything first.
After this, hopefully I’ll write another blog post about running OpenWRT in my home.